


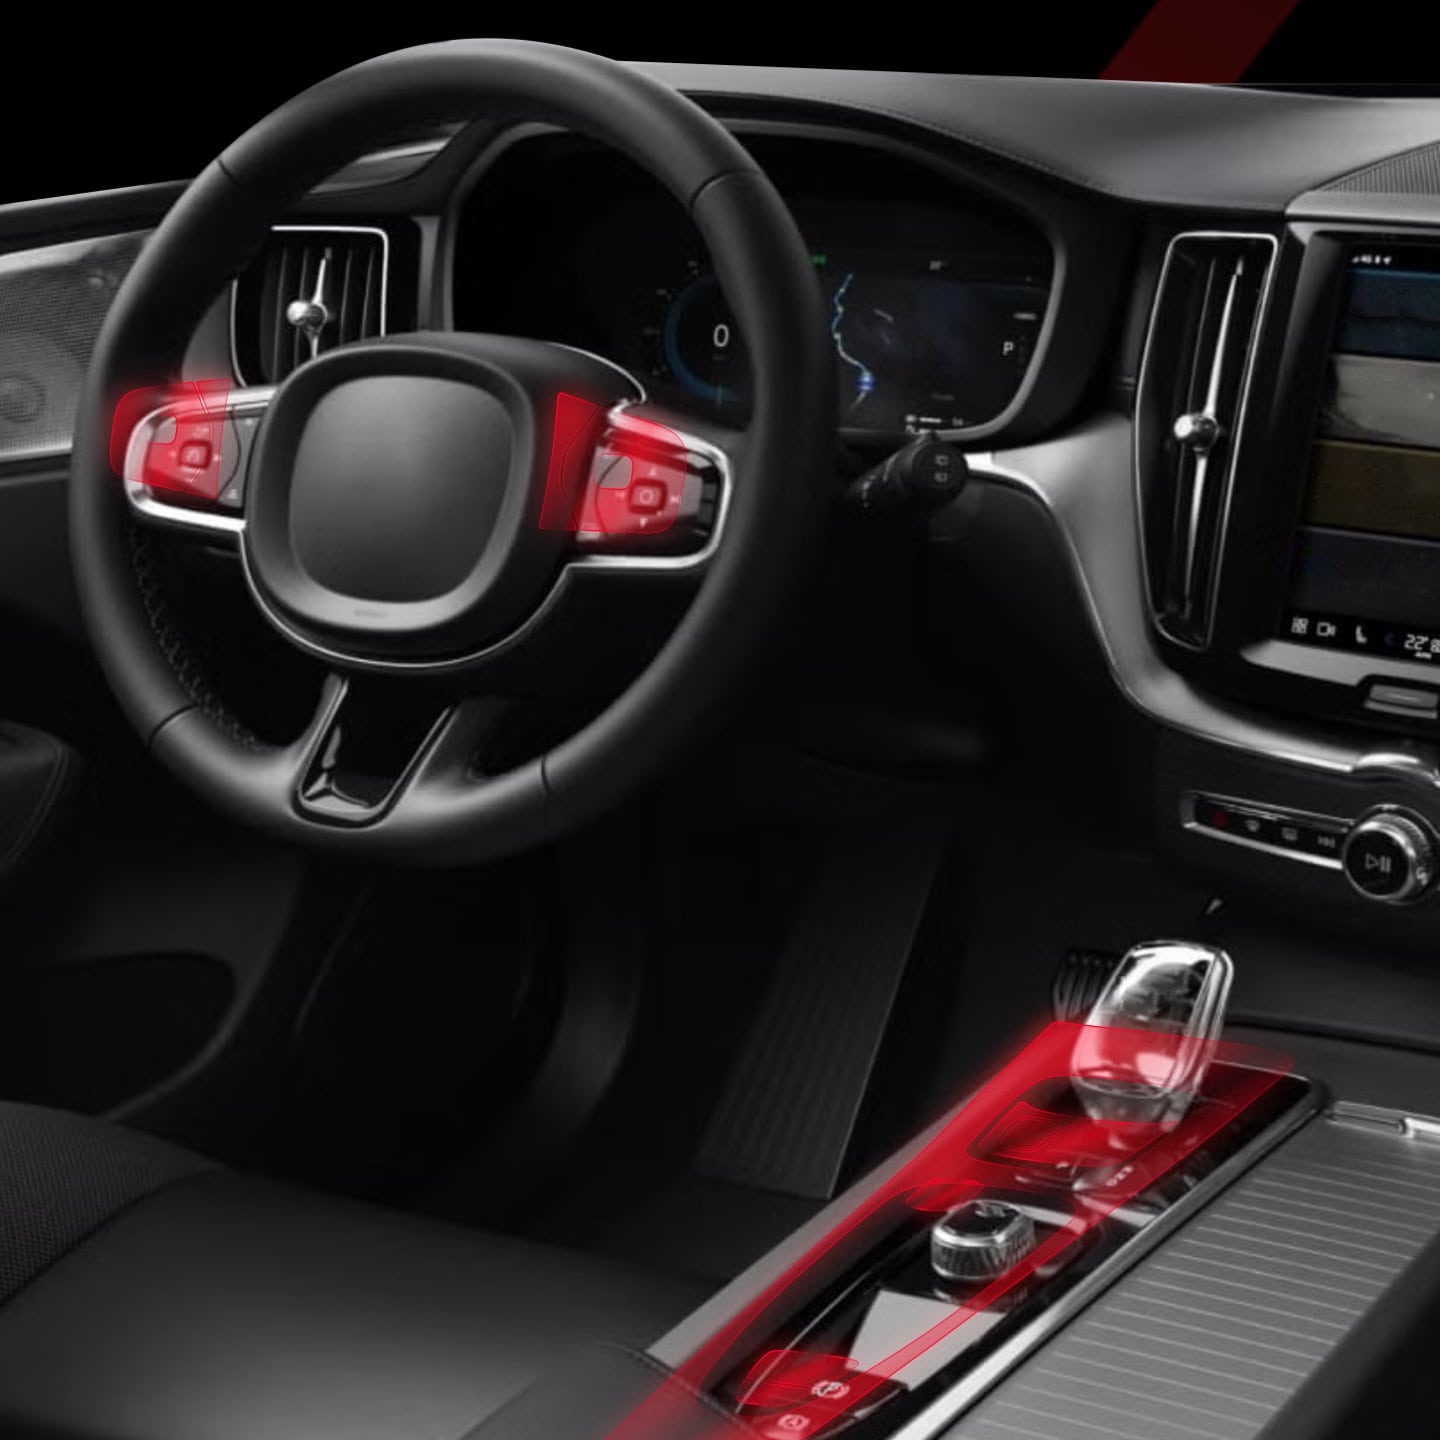

Millimeter-precise fit - as if it were from the factory
Our PianoSkin films are precisely tailored to the contours of your vehicle model using laser technology - for a seamless look and a finish that you can be proud of.
Looks like original. Protects like invisible.

Certified quality - you can rely on
GrizzProtector is managed according to a certified quality management system in accordance with ISO 9001:2015 - inspected by TÜV Rheinland.
This means for you: reliable processes, tested standards and consistently high product quality - from development to delivery.
Our customers trust protective films that are produced under controlled conditions - precise, safe, and durable.

Simple wet installation - step by step
- Thoroughly clean the surface with PianoCleaner and the supplied microfiber cloth to completely remove dirt, dust, and grease.
- Spray the PianoSkin Installer generously onto the surface where the film is to be applied.
- Remove the first protective layer of the film (marked with the red START sticker). Spray some Installer Gel onto the exposed film surface.
- Carefully place the film on the moistened surface and align it precisely. The gel allows easy adjustment.
- If applicable, remove the supplied platforms (if any) to stabilize the underlying film. This step can be skipped if no platform is used.
- Press the film with a squeegee from the center outward to push out the gel. Be careful not to press too hard to avoid damaging the adhesive.
- Remove the next protective layer of the film (START sticker) and repeat the process for all remaining film areas.
- Carefully clean excess gel with the microfiber cloth and PianoCleaner. The freshly applied film must not be loosened during this process.
- Let the film fully adhere now - the adhesive needs about 12 to 24 hours to develop its full bonding strength.

Scratch protection with deep effect
Thanks to its elastic structure, the PianoSkin film evens out fine scratches and makes them almost invisible. At the same time, it protects sensitive surfaces from new scratches, fingerprints, and dirt. The PianoSkin surfaces thus remain permanently clean, well-maintained, and like new.

Preparation before installation
✅Turn off the engine.
✅Thoroughly vacuum the vehicle interior and remove dust.
✅The ideal ambient temperature for installation is about 20 °C.
✅Clean the surface to be covered with the PianoSkin Installer.
FAQ – PianoSkin Folien (Glanz, Matt & Dynamic)
Was ist PianoSkin und wofür ist es gedacht?
PianoSkin ist eine passgenaue Schutzfolie für empfindliche Oberflächen im Innenraum – z. B. Mittelkonsole, Zierleisten oder „Piano-Black“-Flächen. Sie schützt vor Mikrokratzern und erhält den gewünschten Look (glänzend, matt oder als Design-Variante).
Glanz, Matt oder Dynamic – was sind die Unterschiede?
Glanz (Gloss): Satter OEM-Hochglanz mit „Tiefenwirkung“. Betont Linien – Fingerabdrücke sind sichtbarer, lassen sich aber leicht abwischen.
Matt: Elegante, reflexionsarme Optik. Weniger Fingerabdrücke und Blendungen, angenehme Haptik.
Dynamic: Design-Variante mit modernem, stilvollem Erscheinungsbild und besonderer optischer Tiefe – ideal für einen exklusiven Innenraum-Look.
Verändert PianoSkin die Originaloberfläche dauerhaft?
Nein. PianoSkin wird aufgebracht und bei Bedarf rückstandsfrei entfernt. Die Originaloberfläche bleibt erhalten – nur der Schutz und die gewünschte Optik kommen hinzu.
Benötige ich Werkzeug für die Montage?
Nein, die Montage gelingt mit dem beiliegenden Zubehör. Fläche gründlich reinigen, Folie exakt ausrichten und gemäß Anleitung aufrakeln. Die Installation dauert nur wenige Minuten.
Wie entferne ich Luftblasen nach dem Aufbringen?
Kleine Blasen sind nach der Montage normal. Drücke sie mit der Rakel oder einem Mikrofasertuch sanft in Richtung Kante heraus. Staub-Einschlüsse vermeidest du durch gründliche Reinigung vor dem Aufbringen.
Passt jede PianoSkin-Folie auf jedes Fahrzeug?
Nein. Unsere Sets sind fahrzeugspezifisch konstruiert. Prüfe Marke, Modell und Baujahr (z. B. Audi A3 8Y FL 2024–2025). Nur so sitzt die Folie passgenau ohne Überstand.
Beeinträchtigt die Folie Schalter, Touch-Flächen oder Spaltmaße?
Nein. Die Zuschnitte sind so ausgelegt, dass Bedienelemente frei bleiben. Spaltmaße werden nicht „zugeschmiert“ – die Folie liegt flach an und bleibt dünn.
Ist die Folie wiederverwendbar?
Nein. PianoSkin ist auf Einmalmontage ausgelegt. Nach dem Abziehen kann die Klebeseite durch Staub/Fasern beeinträchtigt sein.
Wie lange hält PianoSkin?
Das hängt von Nutzung und Beanspruchung ab. Die Folie schützt zuverlässig vor Mikrokratzern und Abrieb. Bei sichtbareren Spuren kannst du sie einfach erneuern – die Originaloberfläche bleibt geschützt.
Wie pflege ich die folierte Oberfläche?
Mit einem Mikrofasertuch (trocken oder leicht angefeuchtet). Aggressive Reiniger sind nicht nötig. Bei Glanz empfehlen wir sanfte Kunststoffpflege, bei Matt bitte keine wachshaltigen Polishes.